Learning DSPy (2): Understanding the internals
A deeper look into DSPy's internals and how the six pieces work together
This is the second post in a series on learning DSPy ⤴, a modular framework for programming, not prompting LMs. Part 1, introduced the three core abstractions of DSPy: signatures, modules and optimizers, deep-diving into the first two. Having great abstractions like these allows developers to more easily build reliable, self-improving compound AI systems. In this post, we’ll go a bit deeper into the internals of a DSPy program, including the role of adapters and how signatures and modules neatly tie things together, enabling optimization down the line. We’ll also inspect the prompt that DSPy generates under the hood, showcasing how transparent the whole process is, end-to-end.
Looking inside a DSPy pipeline#
Let’s put on our developer hats and think through the code we write for a typical DSPy pipeline. The goal in the simple example below is to extract a structured output (a resume) from the given text using a language model (LM). The code is available here ⤴.

The following components are used in this pipeline:
- LM: DSPy supports all the well-known language model providers, so we start by declaring which one we want to use (including some optional parameters, like temperature, etc., if needed).
- Data model: Pydantic is a first-class citizen in any DSPy pipeline, and it’s used to precisely
describe the structure of the desired data to the LM. In this case, a Pydantic model is defined
that indicates the data types of each field we want in the
Resumemodel1. - Signature: A new signature is created, where you start by writing a docstring that explains your intent, with the input and output fields clearly marked for the LM. Note that whatever’s in the docstring (in this case, “Extract the resume from the text”), is not the same as a conventional prompt — it’s simply a user instruction or a declaration of intent. The full prompt sent to the LM is constructed by an adapter, whose role is described below. The signature allows the user to combine a structured definition (in code) with an instruction in natural language, such that DSPy can then decide what the prompt should look like for the LM.
- Module: In this case, the simplest module,
Predict, is used. The module takes in the signature (which constructed the prompt using the data model and user instructions), and invokes the LM to make a prediction based on the prompt that DSPy formulates for it.
The output of a module in DSPy is a Prediction object (which is different from a Predict module).
The Prediction object contains the requested output fields from DSPy, in this case, resume, which
conforms to the Pydantic model we requested in the signature.
Prediction(
    resume=Resume(first_name='Samuel', last_name='Colvin', languages=['Python', 'Rust'], frameworks=['Pydantic'])
)
Contrary to popular belief, the primary goal of DSPy is not prompt optimization. As can be seen above, DSPy is simply a way to build modular AI systems using composable building blocks. Optimization is optional in DSPy, and is not the primary focus when you’re just starting. You begin any DSPy pipeline by writing the signatures and modules, and run the pipeline end-to-end. You also provide examples (via a small annotated dataset) that allow you to evaluate the baseline before attempting to use an optimizer to improve the program.
To go from the raw inputs to the final output, there’s quite a lot happening under the hood, so it’s worth digging a little deeper into the internals. The following figure highlights the “six pieces” of DSPy:
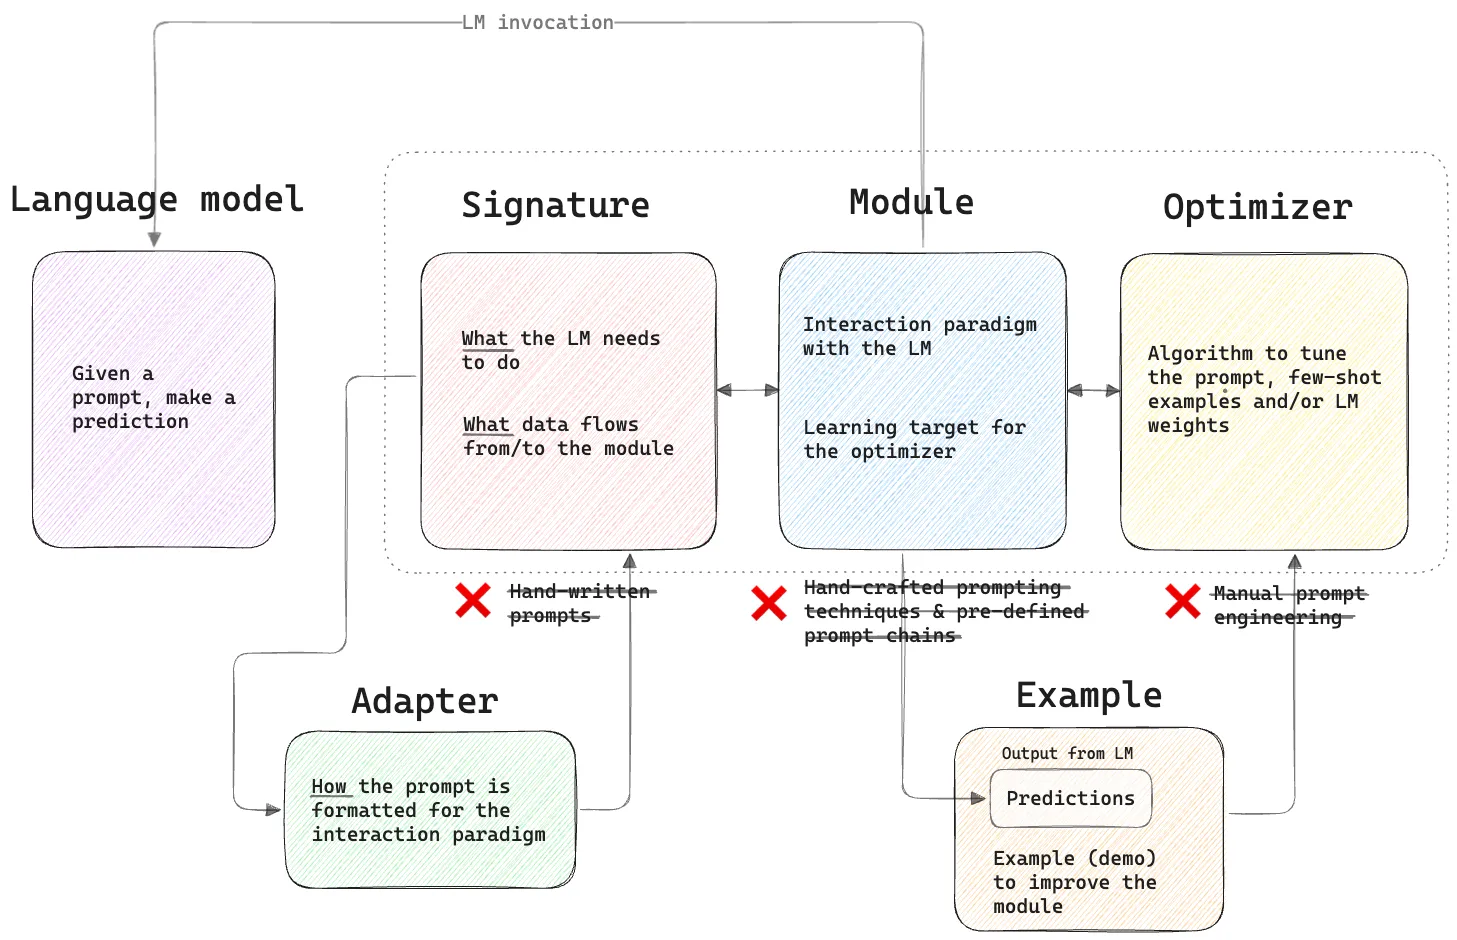
There are a few new additions to the high-level diagram shown in the previous post: LMs, adapters and examples. Signatures specify what the LM should do, and what data flows into the module. The adapter controls how the data and types in the prompt are formatted based on the given signature and module. Below, we’ll inspect the prompt that’s generated by the adapter in more detail.
An Example is the core type for holding data in DSPy. Just like in conventional machine learning, examples
in DSPy allow you to represent data samples for testing (i.e., evaluating) the performance
of the AI pipeline, and to serve as training data to improve the pipeline via optimization. The Prediction
object that’s returned by a module is a special subclass of Example. This means that a module in
DSPy is designed, from the ground up, to work seamlessly with optimizers that use Example instances
to inform the optimization algorithm how to improve the program based on the given Prediction.
The module is responsible for invoking calls to the LM, and any data the module receives is handled
by the signature (and its underlying adapter).
With these design concepts in mind, we can answer the following questions about DSPy:
How is it declarative?#
Signatures, modules and optimizers are all declarative ways to express the user’s intent to the LM. You can write any logic for your domain with LMs using clean, readable and concise code.
Signatures
In conventional prompting frameworks, it’s the norm for users to write the entire prompt by hand, observe the output, and iteratively refine the wording of the prompt till the desired output is achieved. This process can be tedious and requires a deep understanding of the model’s behaviour. In DSPy, you focus on defining signatures, not prompts. The signature serves as a high-level description of the task for DSPy, not the LM. It’s DSPy’s responsibility to then describe the task to the LM to achieve the intended output.
Modules
The conventional idea of prompting involves the user formulating the strategy for how
to interact with the LM, by writing in the instructions by hand. For example, today, chain-of-thought
prompting or few-shot prompting are common strategies to elicit more complex responses from the LM
in a way that adheres to the system message in the prompt. In DSPy, you simply declare the high-level
prompting strategy by either using a built-in module (like Predict, ReAct or ChainOfThought) or by
defining your own custom module.
Optimizers
The conventional idea of prompt optimization is one where the user is expected
to handle the low-level details of extracting parts of the prompt or defining few-shot examples so
that the LM better understands the task. In DSPy, optimization is a higher level construct,
where the module seamlessly integrates with the optimizer
to automatically handle these details (via Example and Prediction instances), allowing the
user to focus on higher-level task definitions, such as defining their intent via the signature,
and defining examples for evaluation.
To optimize a DSPy program, you simply declare what optimizer you want,
give it the examples and the required hyperparameters, and call the module’s compile method.
That’s it!
How is it self-improving?#
In DSPy, a user writes an “LM program”, which looks something like the example shown above. All the optimizer needs to improve a given program is examples, i.e., demonstrations of how a “good” result should look. That’s it.
It’s important to note that optimizers in DSPy are designed to not rely on gradients. Because a module can be composed of multiple other modules, each with their own specific tasks and behaviours, DSPy makes no assumptions whatsoever about the continuity of the input space. DSPy optimizers can operate in a highly discontinuous input space for any custom module without relying on gradient information or access to an LM’s weights. This aspect of optimization in DSPy is what enables self-improvement, because all the optimizer needs to improve the program is examples.
Using a combination of optimizers, an LM program can gradually be improved over time as more and more examples are obtained from the real world, serving as training data for ever-improving optimization algorithms coming out every few months. DSPy’s optimizers can thus operate in a continuous feedback loop, where the performance of the LM program can be iteratively improved based on monitoring real-world outcomes, all while making the metrics that are being optimized for, clearly visible and transparent.
Show me the prompt#
At this point, it’s worth revisiting an excellent blog post ⤴ from 2024 by Hamel Husain2 that stresses on the importance of developers deeply understanding and inspecting what goes into a prompt. In this section, we’ll explore what DSPy does under the hood, showing that it isn’t dark magic or a blackbox in any way, shape or form.

The first step is to define an LM.
import dspy
# Put in your LM of choice here
lm = dspy.LM('gemini/gemini-2.5-flash', api_key='GEMINI_API_KEY')
dspy.configure(lm=lm)
To inspect the prompt being generated by DSPy, you can use the dspy.inspect() method downstream
of the module being run.
# Define your data model and signature

# Create a Predict module that uses the `ExtractResume` signature
extractor = dspy.Predict(ExtractResume)

text = """
    Samuel Colvin is the creator of Pydantic. His main languages
    are Python and Rust.
"""

# Run the module
resume = extractor(text=text)
# Print the most recent LM invocation's prompt
print(dspy.inspect_history(n=1))
The prompt that’s formulated by the adapter is as follows:
System message:

Your input fields are:
1. `text` (str):
Your output fields are:
1. `resume` (Resume):
All interactions will be structured in the following way, with the appropriate values filled in.

[[ ## text ## ]]
{text}

[[ ## resume ## ]]
{resume}        # note: the value you produce must adhere to the JSON schema: {"type": "object", "properties": {"first_name": {"type": "string", "title": "First Name"}, "frameworks": {"type": "array", "items": {"type": "string"}, "title": "Frameworks"}, "languages": {"type": "array", "items": {"type": "string"}, "title": "Languages"}, "last_name": {"type": "string", "title": "Last Name"}}, "required": ["first_name", "last_name", "languages", "frameworks"], "title": "Resume"}

[[ ## completed ## ]]
In adhering to this structure, your objective is:
        Extract the resume from the text.

User message:

[[ ## text ## ]]

      Samuel Colvin is the creator of Pydantic. His main languages
      are Python and Rust.


Respond with the corresponding output fields, starting with the field `[[ ## resume ## ]]` (must be formatted as a valid Python Resume), and then ending with the marker for `[[ ## completed ## ]]`.
The system message begins with an explicit instruction stating what the signature’s input and output fields are. This is followed by a template that describes how the interaction will be structured, with placeholders for each input and output field. Towards the end of the system message, the instructions provided in the signature’s docstring are placed as-is (with no modifications).
In the user message, the actual input data is placed, and the prompt ends with the instructions for the output types being reiterated. This is the full prompt that’s being formulated under the hood, and its contents are transparent to the user.
What if we use a different module than Predict? Because DSPy is declarative, the user doesn’t need to change
the signature — by changing the module, the underlying prompting strategy changes automatically. The
example below shows the prompt if a
ChainOfThought module were used instead of Predict. Note the highlighted lines below: it’s very
similar to the Predict module’s prompt, except that there are
additional instructions placed in the output field description that tells the LM to include a reasoning
of its answer.
System message:

Your input fields are:
1. `text` (str):
Your output fields are:
1. `reasoning` (str):
2. `resume` (Resume):
All interactions will be structured in the following way, with the appropriate values filled in.

[[ ## text ## ]]
{text}

[[ ## reasoning ## ]]]
{reasoning}

[[ ## resume ## ]]
{resume}        # note: the value you produce must adhere to the JSON schema: {"type": "object", "properties": {"first_name": {"type": "string", "title": "First Name"}, "frameworks": {"type": "array", "items": {"type": "string"}, "title": "Frameworks"}, "languages": {"type": "array", "items": {"type": "string"}, "title": "Languages"}, "last_name": {"type": "string", "title": "Last Name"}}, "required": ["first_name", "last_name", "languages", "frameworks"], "title": "Resume"}

[[ ## completed ## ]]
In adhering to this structure, your objective is:
        Extract the resume from the text.

User message:

[[ ## text ## ]]

      Samuel Colvin is the creator of Pydantic. His main languages
      are Python and Rust.


Respond with the corresponding output fields, starting with the field `[[ ## reasoning ## ]]`, then `[[ ## resume ## ]]` (must be formatted as a valid Python Resume), and then ending with the marker for `[[ ## completed ## ]]`.
The above examples show that in DSPy, the user doesn’t actually write the prompt that’s sent to the LM. The user simply defines a signature, which is a declarative specification that combines natural language instructions (via the docstring) and structured types (in code) that’s formatted a specific way to describe what they want from the LM. The signature uses an adapter ⤴ to format parts of the prompt. When starting to work with DSPy, it’s not necessary to think too much about adapters (just know that they exist). The signature is the primary interface that you need to work with, and serves as the entry point into a DSPy workflow.
What’s in a module?#
The module is the core unit of a DSPy program that takes in a signature (or a composition of signatures, as shown in part 1), and encapsulates the program’s logic and control flow. Modules are composable, allowing you to easily bake in any arbitrary domain or business logic into the pipeline.
Just as signatures combine natural language instructions
with a structured type system, modules define the program’s control flow (in code) via
conventional programming constructs, such as if-else statements, for loops and deterministic
function calls interweaved with LM calls as needed.
The example below initializes DSPy’s built-in Predict module for the resume extraction and
inspects its contents by running the .save() method.
# Define `ExtractResume` signature here
# ...
# Initialize module
extractor = dspy.Predict(ExtractResume)
# Save the module
extractor.save("my_extractor.json")
This writes the program’s state to a JSON file, that looks like this:
{
  "traces": [],
  "train": [],
  "demos": [],
  "signature": {
    "instructions": "Extract the resume from the text.",
    "fields": [
      {
        "prefix": "Text:",
        "description": "${text}"
      },
      {
        "prefix": "Resume:",
        "description": "${resume}"
      }
    ]
  },
  "lm": null,
  "metadata": {
    "dependency_versions": {
      "python": "3.13",
      "dspy": "3.0.2",
      "cloudpickle": "3.1"
    }
  }
}
Inspecting the program’s contents this way reveals some interesting details about the “surface area” for optimization that the module exposes. In its raw, unoptimized state, a module stores empty objects for traces, training examples and demos. These are all placeholders for the optimizer, which will add those in when the module is compiled (we’ll explore what optimizers do in detail in the next post).
The signature’s state is also fully persisted within the module’s JSON representation. This is because the module relies entirely on the signature to obtain the data it needs to prompt the LM, and also to parse/coerce the LM outputs to the types specified by the signature. Each signature consists of the following items:
instructions: The user instruction as per the signature’s docstring.fields: A list of input/output fields for the task, each with aprefixanddescription.prefix: A string that prefixes the field in the prompt.description: A string that describes the field’s content.
Initially, the instructions field of a module is exactly what the user writes in the signature’s docstring.
After optimization via algorithms like MIPROv2 or GEPA, these instructions are completely rewritten by
LMs, so the new, optimized module will persist those instructions instead.
Because a module’s state can be persisted to JSON, it’s trivial to version-control it and revert to a previous state if needed. This is great from a reproducibility perspective, because an optimized DSPy program can easily be shared with others, restored and evaluated.
Robustness to paradigm shifts#
Exposing signatures and modules as the primary interface to the user allows DSPy to be incredibly robust to future paradigm changes as AI models evolve:
- If new interaction paradigms with LMs emerge (e.g., something more advanced than
ChainofThought), a new custom module can be created to incorporate the new logic, so just a single line of code may change to change the behaviour of the entire system. - If better formats become available that could improve the way types are represented to the LM in the prompt, custom adapters (which are handled by the signature and the underlying adapter) can easily be created ⤴. Again, with only a single line of code changed, the new adapter can be seamlessly integrated into the existing pipeline.
Even in a more drastic scenario, if the entire paradigm of auto-regressive language models and transformers give way to something else that’s not transformer-based, because optimizers in DSPy don’t rely on model weights being accessible, new optimizers can be developed without changing the underlying logic of signatures and modules.
All these are incredible design features that explain why the fundamental abstractions of DSPy have largely remained unchanged since its inception in 2022, despite so many rapid advancements in LMs and their prompting strategies. It’s arguable that DSPy’s abstractions are even more useful today than they were in the past, because they offer a flexible, transparent and structured way to incorporate human intent into AI systems.
Conclusions#
The design philosophy of DSPy is centered around modular components that help build better AI systems. At first glance, the abstractions offered may seem to be at a rather high-level, but when explored more deeply, they offer just the right amount of flexibility and user control to express almost any desired logic.
As Omar Khattab, creator of DSPy, said in this fireside chat ⤴: DSPy is more than just a framework. It functions like a high-level language that helps you specify the behaviour you want, by saying things in the language you actually speak, and combines it with some structure, using code. Signatures, modules and optimizers work together to conveniently expose these three fundamental ways of communicating human intent to language models:
- Code: Provides structure (via a type system)
- English: Provides intent (in natural language)
- Examples: Provides demonstrations to tune the long tail of edge cases where tweaking prompts or adding few-shot demos can improve the outcome
DSPy uses a combination of code, English and examples to elicit the required behaviour from the AI system, without any manual tuning of prompts. Once the baseline performance is known (because evaluation is baked into the process), an optimizer can seamlessly integrate with the given signatures and modules to improve the system.
The more you work with DSPy, the clearer it becomes that signatures are a better abstraction than freeform text prompts, because of the way they combine structure (code) and intent (English). Modules are better abstractions than functions or prebuilt LM components, because they are far more composable and adaptable — they define the logic of the program (via code), and they can be automatically improved with optimizers (via examples).
Hopefully, this post, in combination with the previous one, highlights the DSPy philosophy well (and why it matters if you’re building compound AI systems). In the next post, we’ll go deeper into optimizers, and walk through a workflow that improves the performance of a given DSPy program. 🚀
The code for the examples shown in this post is available here ⤴. You can also check out the other posts in this series: 👇🏽
Footnotes#
-
You don’t have to define Pydantic models upfront in DSPy. As shown in the docs ⤴ you can directly start by defining string signatures as a first step. However, for any non-trivial structured output task in DSPy, it’s typical to use the “class-based approach”, i.e., creating Pydantic models upfront that allow more precise definitions of complex input and output types (with descriptions) and passing those to the signature. ↩
-
It’s very interesting how much the DSPy community’s own understanding of what it is has evolved between 2024-2025. Today, DSPy has become a widely loved framework by its ever-growing user community, not just for optimizing prompts, but for helping users build reliable, modular AI systems. While the abstractions DSPy uses may seem very high-level at initial glance, every component is transparent, and the overall design of the framework makes it very flexible and easy to customize to almost any workflow. A lot of credit is due to the amazing @lateinteraction ⤴ for his patient and detailed explanations about DSPy’s philosophy on X. ↩