Learning DSPy (1): The power of good abstractions
An introduction to DSPy, its core abstractions, and why it matters for AI engineers
Unless you’ve been living under a rock for the past year, you’ve probably heard of DSPy ⤴. You’ve likely seen plenty of posts online by users of DSPy raving about it, but you put it in the back of your mind, saying “sounds interesting… but it seems complex. I don’t really get it”. That was me, in 2024. Fast forward to today, and things look radically different, at least to my eyes. Having spent the last several weeks engaging with the amazing @DSPyOSS ⤴ community on X, and building with DSPy for multiple use cases, it’s finally become clear to me how useful and well-designed it really is, so I’ve decided that it’s worth an entire blog post just explaining it in terms of its abstraction philosophy.
Your prompt’s probably not as good as you think it is#
Anyone who’s spent time prompting language models (LMs) has probably learned this the hard way — a small perturbation to the prompt string you write can have unforeseen consequences on the downstream task. This is especially true in compound AI pipelines, where you combine several prompts to solve a larger, more complex task. When you take a step back and think about where you actually are in prompt space, you come to the following humbling realization: there’s an infinite number of alternative prompts out there that could potentially get you a better result. All you really did after painstakingly tweaking words and/or word order in the prompt message, was to hit upon an arbitrary point in this space, which is likely far from optimal.
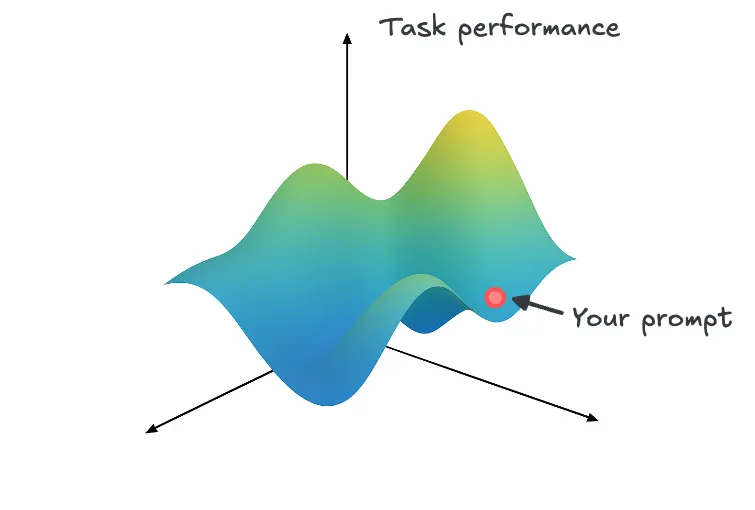
Of course, the real prompt space is likely highly discontinuous, and exists in higher-dimensional space — the image above is for illustrative purposes only. The larger point is still the same: As a developer, it’s not clear how the changes made to the prompt affect the final outcome. Put simply, natural language prompts aren’t that good an interface for developers who want to build reliable AI software.
Conventional LM or agent frameworks make the developer begin with the question:
“What prompt can I write to achieve the given outcome”?
This might be a reasonable approach to rapidly test and iterate on your ideas right away. However, when building complex software with LMs, it’s important to recognize that the prompt engineering process never ends — the moment there’s a newer and better model that comes along (there always is), you need to start all over, because prompts are brittle, they interact with different LMs in different ways, and they can break your system for subtle reasons that are incredibly hard to debug.
The power of good abstractions#
As a developer learning a new AI framework, it always helps to understand the following: a) the abstractions you’re given to work with, and b) the level of abstraction you’re working at. As you read and digest the documentation, it becomes apparent what primitives you can use to compose and build together the workflow you have in your head or on the whiteboard. Too high-level an abstraction, and you end up with rigid building blocks that you need to wrestle with to align them to your task. Too low-level, and you’re left writing tons of boilerplate and repetitive code in each and every one of your projects.
As you use a framework across a wide variety of problems, you begin to see very clearly what it lacks and what parts you need to customize for your use cases. Because the whole industry is so fast-moving and evolving on a daily basis, it’s also worth thinking about the potential need for future-proofing your code. With all this in mind, let’s list the qualities of what makes for good abstractions in any framework:
- Simplicity: Provides an easy entry point for developers to begin building and testing out their ideas.
- Clarity: Offers clear semantics, making it obvious how to use them and what to expect.
- Flexibility: Enables rapid changes to workflow logic during early experimentation while making it easy for developers to customize for their specific needs.
- Longevity: Withstands the test of time, minimizing the need for drastic code changes as the larger AI ecosystem evolves.
Designing good abstractions like this, at a level that’s neither too high nor too low, for every possible use case, in a rapidly changing world, is hard. Yet, every day I use DSPy, it’s amply clear to me that they’ve hit upon a great set of abstractions that balance these qualities really well.
What is DSPy?#
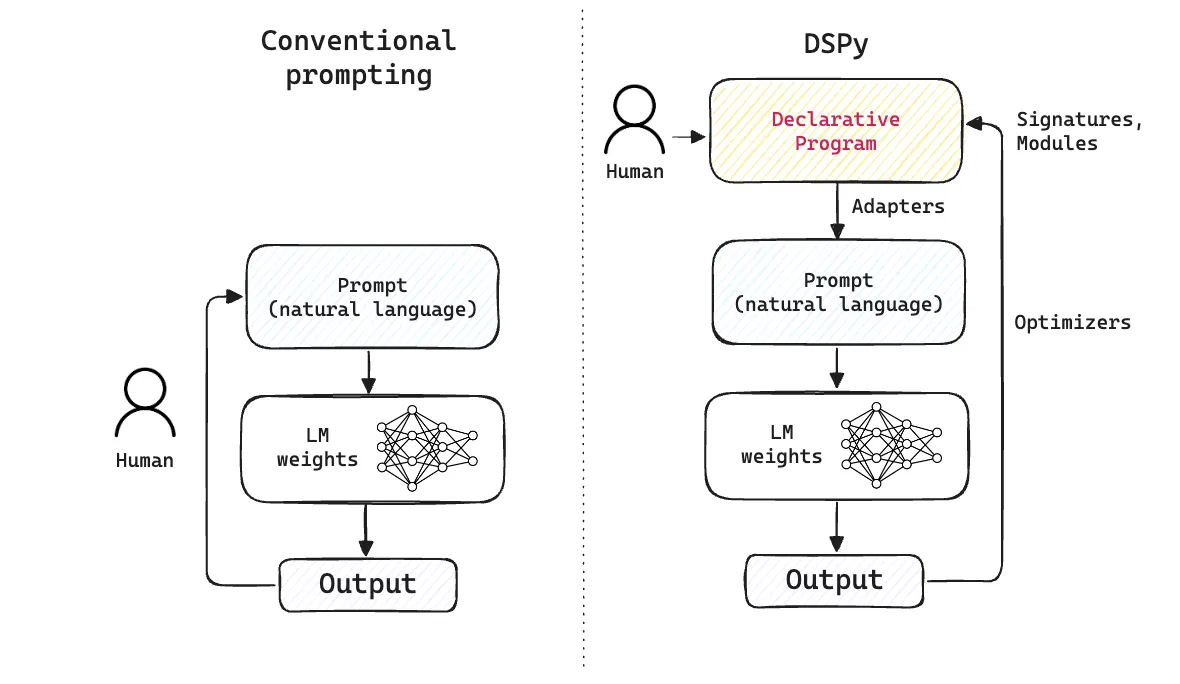
DSPy ⤴, or Declarative Self-improving Python, is a framework for programming — rather than prompting — language models. Instead of tuning prompts through trial and error (which is a manual, tedious process), you write modular Python code using composable building blocks, and teach your LM to produce higher quality outputs via an optimization process. Under the hood, the LM still sees a prompt, but one that’s automatically generated by DSPy based on the code you write. To begin using DSPy, all you really need is to wrap your head around these three core abstractions:
Let’s unpack them to understand their purpose (with examples in code, in the next section).
-
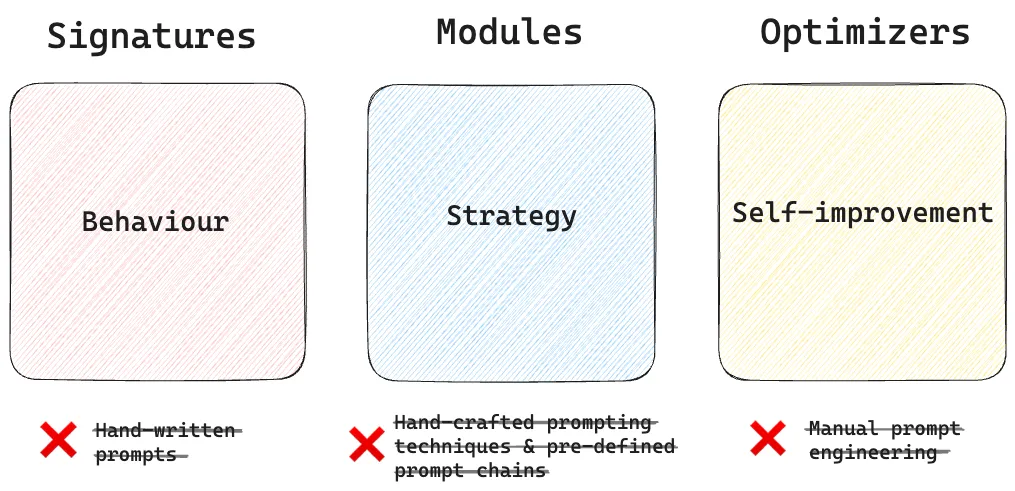
Signatures: Signatures specify the input and output types to the LM and what the expected behaviour is. They let you tell the LM what it needs to do, rather than specify how it should do it.
-
Modules: Modules are building blocks for programs that interact with LMs. They are generalized to take in any signature while abstracting away the prompting technique for interacting with the LM (e.g., chain of thought). DSPy modules are highly composable, meaning that you can combine multiple modules together to create more complex modules for any task. Importantly, modules serve as learning targets for the optimizer. As LMs and prompting strategies evolve, so too does the module.
-
Optimizers: Optimizers improve the performance of a DSPy module with annotated examples of input-output pairs. The optimizer can automatically improve and generate prompts, few-shot examples or the language model weights to produce a new, improved module that can perform better on that task.
The table below summarizes the tasks you may be used to in conventional LM frameworks, and what DSPy replaces them with:
| DSPy abstraction | Conventional frameworks |
|---|---|
| ✅ Signatures | |
| ✅ Modules | |
| ✅ Optimizers |
Once you learn DSPy, you don’t need to rely on predefined prompt chains or manually tune prompts by hand. You get composable, flexible building blocks that can be easily adapted to your specific needs. DSPy inverts the traditional thought process when working with LMs: rather than first thinking about ways to phrase the prompt, you’re focused on the following very important questions:
What is my intent, and what does success look like for my specific task?
Any DSPy workflow begins with you thinking about the desired outcomes and how you can objectively measure them. Once you define metrics that capture the essence of success for your domain, you proceed to write your signature that declares your intent, and specify the expected input/output types. The module handles the signature, formulates the prompt, and invokes the LM calls. Initially, you don’t need to (and shouldn’t) care about optimization. Simply focus on writing the signatures and modules to express your desired logic, and you’ll be surprised to find how effective your base DSPy pipeline is, no matter what task you throw at it.
Walkthrough#
Let’s make this more concrete by walking through a realistic scenario where DSPy can be useful. Imagine you’re an AI developer working at a market analysis consultancy. Your task is to automate the extraction of information regarding mergers and acquisitions from news articles in the mining industry. Let’s assume you have access to a high-quality news feed with articles from specialized sources that describe the latest developments in the M&A space in natural language. Here’s an example article describing an acquisition:
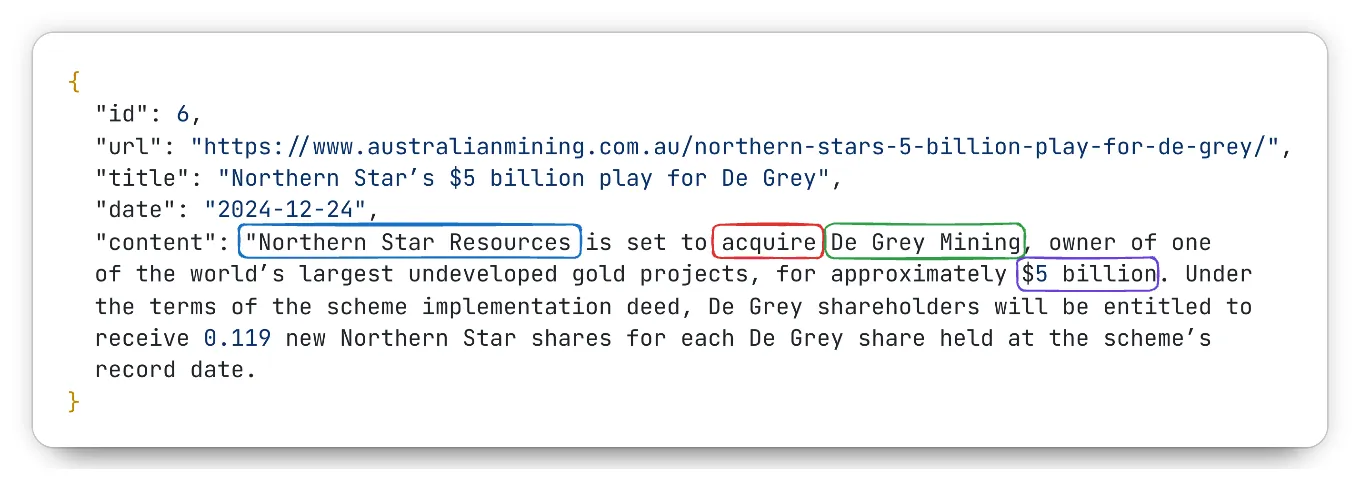
The article talks about Northern Star Resources’ acquisition of De Grey Mining for $5 billion. There are company names, commodities (in this case, gold) and monetary amounts mentioned in the text, which are all useful fields for a downstream market analysis of acquisitions in the gold mining industry.
Similarly, in other cases, there could be merger events, where, unlike acquisitions, one company merges with another, to create a third (new) entity.
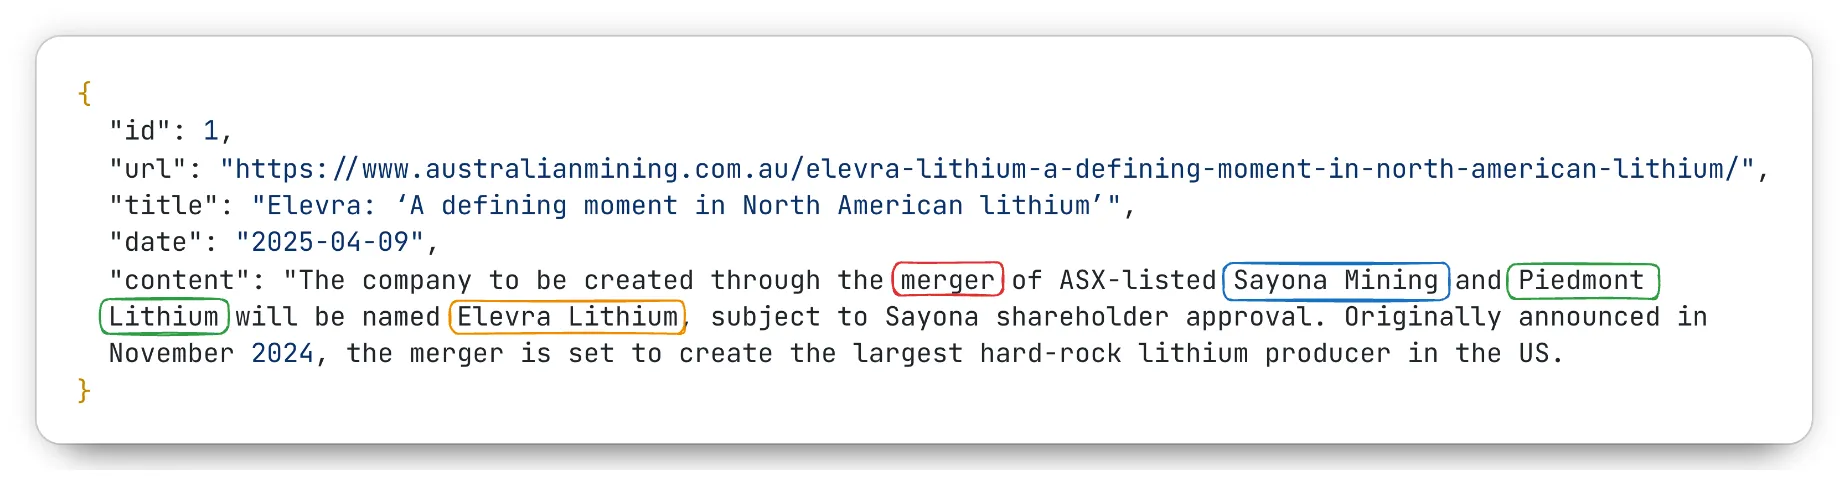
In either case, there are key entities that need to be extracted for analysis, such as the companies involved, the nature of the transaction (acquisition or merger), and the financial details. The language used to describe these events is often complex and nuanced, requiring an LM to make an assessment on whether the merger or acquisition actually happened — for example, certain articles may mention the fact that a deal was considered, but may not have actually materialized in the real world.
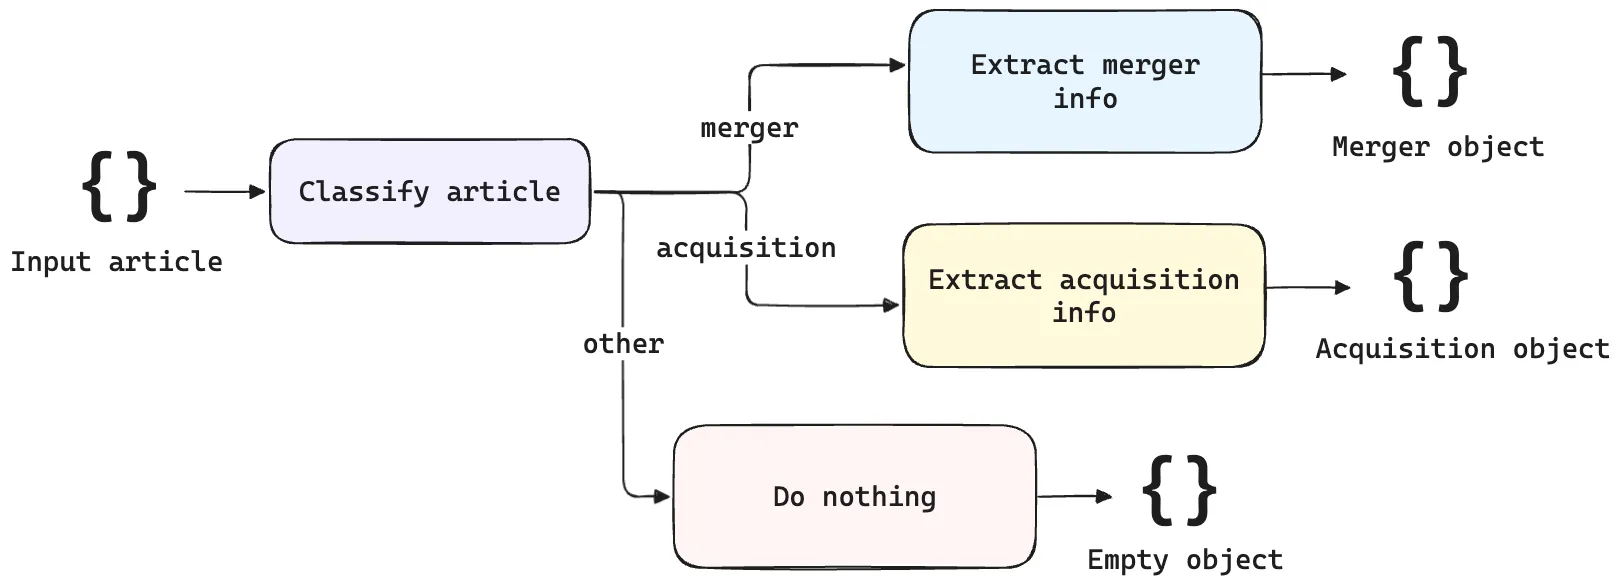
Based on domain understanding, we know that mergers and acquisitions are fundamentally distinct events. So, we can decompose the larger task into smaller components, each with their own LM call. First, we classify the article based on whether it’s talking about a merger or an acquisition. Depending on the classification, the appropriate extraction workflow is applied. Here’s the workflow we’ll build in DSPy.
Define success metrics#
Let’s begin with the DSPy mindset of defining what “success” means for this task. For each news article, we want to a) classify it as belonging to the type “merger”, “acquisition” or “other”, and b) extract the relevant fields of interest that are exact matches with what’s in the source data. Below are some of the fields that are captured via exact matches:
- Company names
- Currency symbols:
USD,CADorAUD - Company stock tickers
- Financial amounts (e.g.,
5 billion): In this case, the multipliers (“mn” or “bn”) should be extracted as a full word (million or billion) for the purposes of standardization in the downstream analysis.
The success metric for this example is thus defined as follows:
Our result object’s values should be an exact match with gold (annotated) data that has the same structure and field names.
Language model#
In this example, we’ll use OpenRouter for the LM calls so that we can easily swap out language models from multiple popular providers. However, it’s simple to set up and configure any language model of your choice in DSPy as follows:
import dspy

# This example uses OpenRouter. Switch to any other LM provider as needed
lm = dspy.LM(
    model="openrouter/google/gemini-2.0-flash-001",
    api_base="https://openrouter.ai/api/v1",
    api_key="<OPENROUTER_API_KEY>"",
)
dspy.configure(lm=lm)
We’ll use the google/gemini-2.0-flash-001 model for our example below.
Define complex types#
Because the task requires complex objects as output, we can use Pydantic models to easily declare
complex types to our signature in the next step.
Three Pydantic models are created: Merger, Acquisition, and Other, for each output type.
from pydantic import BaseModel, Field

class Merger(BaseModel):
    article_id: int | None = Field(default=None)
    company_1: str | None = Field(description="First company in the merger")
    company_1_ticker: list[str] | None = Field(
        description="Stock ticker of first company"
    )
    company_2: str | None = Field(description="Second company in the merger")
    company_2_ticker: list[str] | None = Field(
        description="Stock ticker of second company"
    )
    merged_entity: str | None = Field(description="Name of merged entity")
    deal_amount: str | None = Field(description="Total monetary amount of the deal")
    deal_currency: Literal["USD", "CAD", "AUD", "Unknown"] = Field(
        description="Currency of the merger deal"
    )
    article_type: Literal["merger"] = "merger"

class Acquisition(BaseModel):
    article_id: int | None = Field(default=None)
    parent_company: str | None = Field(description="Parent company in the acquisition")
    parent_company_ticker: list[str] | None = Field(
        description="Stock ticker of parent company"
    )
    child_company: str | None = Field(description="Child company in the acquisition")
    child_company_ticker: list[str] | None = Field(
        description="Stock ticker of child company"
    )
    deal_amount: str | None = Field(description="Total monetary amount of the deal")
    deal_currency: Literal["USD", "CAD", "AUD", "Unknown"] = Field(
        description="Currency of the acquisition deal"
    )
    article_type: Literal["acquisition"] = "acquisition"

class Other(BaseModel):
    article_id: int | None = Field(default=None)
    article_type: Literal["other"] = "other"
As can be seen, we’re not limiting ourselves in DSPy to using flat data models and simple types. With the power of Pydantic, it’s possible to deal with richer data representations when working with LMs.
Signatures#
The next step is to create signatures, akin to how you’d write prompts in other frameworks, but DSPy’s approach is more declarative.
Let’s start with the first signature that performs classification of article types. We create a signature by subclassing
dspy.Signature and defining a docstring in Python. The purpose of the docstring is to declare
our intent to the LM, i.e., state in clear, crisp language what we want to achieve.
class ClassifyArticle(dspy.Signature):
    """
    Analyze the following news article and classify it according to whether it's
    a "Merger" or "Acquisition".

    If it mentions a potential or failed deal, classify it as "Other".
    """
    text: str = dspy.InputField()
    article_type: Literal["merger", "acquisition", "other"] = dspy.OutputField()
We’re simply asking the LM to classify the article as either a merger or an acquisition, without providing the specifics of what those terms mean. Also, we clarify under what conditions the “other” category is assigned. Anything that’s domain-specific and can serve as important context for the LM, goes into the docstring. The input field is the text of the article, and the output field is a Python literal representing the article type.
Next, we define the signatures for information extraction for mergers and acquisitions. The input fields
for each case are the article texts (strings), and the output fields are the Pydantic models defined
for Merger or Acquisition.
class ExtractMergerInfo(dspy.Signature):
    """
    Extract merger information about companies from the given text.
    """
    text: str = dspy.InputField()
    merger_info: Merger = dspy.OutputField()


class ExtractAcquisitionInfo(dspy.Signature):
    """
    Extract acquisition information about companies from the given text.
    """
    text: str = dspy.InputField()
    acquisition_info: Acquisition = dspy.OutputField()
Once again, note how concise the docstrings are. We’re not fixating on every word that goes into the prompt — there’s plenty of room for optimization later! Signatures are an abstraction that replace the normally verbose prompts describing the specifics of what we want. We simply declare our intent via declarative Python code, and allow DSPy to formulate the prompt for us1.
Modules#
Modules are the meat of a DSPy pipeline, and they define the interaction paradigm with the LM.
DSPy offers several useful built-in modules ⤴. The simplest
one is a Predict module that uses a basic predictor (given a prompt, predict an output). For
this classification and information extraction workflow, this is all we need.
Let’s briefly discuss how the input text to the predictor
is preprocessed. Rather than sending the entire news article (which can be long and verbose),
a useful heuristic, in this case, would be to pass in the top sentences from the article.
M&A news articles typically describe key events right at the top, with a descriptive title and a
few sentences that capture the larger meaning. Using only the title and the top sentences
can help create a more focused input for the classification predictor, while also saving tokens. The
code for this is excluded from this post for brevity, but you can check the extract_first_n_sentences
function in the code here ⤴.
Built-in modules
To use a built-in module in DSPy, you pass in the signature that defines the task:
# Concatenate the article and first N sentences
# ... Gather the article objects here ...
text = article["title"] + extract_first_n_sentences(article["content"], num_sentences=5)
# Initialize Predict module
classifier = dspy.Predict(ClassifyArticle)
# Call the Predict module and pass in the input
article_type = classifier(text=text)
print(article_type)

# Output:
# Prediction(
#     article_type='merger'
# )
Using a module always involves the following two steps: a) Initialize the module by passing in its signature,
and b) Call the module by passing in the input fields. The output of the module is a Prediction object
that conforms to the output fields defined in the signature.
Custom modules
The best part about modules is how composable they are. In this case, we have a compound workflow, where an LM’s outputs are passed to another LM downstream. Rather than using a single linear flow where we string together module calls in Python, we can write a custom module that composes together these calls into a single class. Here’s the custom module that accomplishes our entire task for information extraction:
class Extract(dspy.Module):
    def __init__(self):
        self.classifier = dspy.Predict(ClassifyArticle)
        self.merger_extractor = dspy.Predict(ExtractMergerInfo)
        self.acquisition_extractor = dspy.Predict(ExtractAcquisitionInfo)

    def classify(self, text: str, num_sentences: int = 3) -> str:
        text = extract_first_n_sentences(text, num_sentences=num_sentences)
        result = self.classifier(text=text)
        article_type = result.article_type
        return article_type

    def forward(self, text: str, article_id: int) -> Merger | Acquisition | Other:
        # Implement extraction logic here
        article_type = self.classify(text)
        if article_type == "merger":
            extracted_result = self.merger_extractor(text=text, num_sentences=5)
            merger_info = extracted_result.merger_info
            merger_info.article_id = article_id
            return merger_info
        elif article_type == "acquisition":
            extracted_result = self.acquisition_extractor(text=text, num_sentences=5)
            acquisition_info = extracted_result.acquisition_info
            acquisition_info.article_id = article_id
            return acquisition_info
        else:
            return Other(article_id=article_id, article_type="other")
In the __init__ block we pass in all the modules. Anything that involves an LM invocation should
go into this block. Any custom methods, for example, classify, which we need to get the article type,
comes after the __init__ block. The forward method is where you implement the actual logic for
the workflow, and is the target for the optimizer downstream. Note how the if-else logic implements
the branched workflow from our diagram above.
Calling a custom module is just as simple as calling a built-in module. Simply initialize the module without any arguments
(the __init__ block has all the submodules with their signatures). Then, you can just invoke the module by
calling it, passing in the required parameters to the forward method:
# Concatenate the article and first N sentences
# ... Gather the article objects here ...
text = article["title"] + extract_first_n_sentences(article["content"], num_sentences=5)
# Initialize custom Extract module
extractor = Extract()
# Call the Extract module and pass in the input
result = extractor(text=text, article_id=article_id)
print(result)

# Output:
# article_id=1 company_1='Sayona Mining' company_1_ticker=['ASX']
# company_2='Piedmont Lithium' company_2_ticker=None
# merged_entity='Elevra Lithium' deal_amount=None
# deal_currency='Unknown' article_type='merger'
This runs through the entire pipeline: We classify the article, which in this example is a merger,
and then extract the names of the companies involved along with all the other fields present in
the Merger Pydantic model2.
What’s the true power of a module?
Modules are a powerful construct in DSPy, because they simultaneously serve several functions:
- They allow for easy composition of complex workflows. By encapsulating all the logic for a specific task within a module, you can easily express a combination of deterministic and LM-based logic in a concise and readable manner
- They serve as learning targets for the optimizer. Within a single compound module, you can make several
submodules (that could each be built-in DSPy modules, like
PredictorChainOfThought, or other custom modules). The final output of the module (i.e., whatever is returned by theforwardmethod), is all the optimizer needs to improve the module via examples of input/output pairs. - They handle any kind of signature, and abstract away the hard-to-understand parts (for e.g., how the phrasing of the prompts affects the outcome), and instead, allow the developer to focus on the more important task of defining examples for evaluation and optimization downstream.
The latter two points are particularly significant towards understanding the true power of the module abstraction in DSPy. Rather than separately optimizing each submodule, defining a custom module in DSPy allows you to jointly optimize them all in a single optimization run — all you need is a set of input/output pairs that cover the full range of behaviours you want to optimize for. We’ll cover an example on optimization in the next post.
When you compare this philosophy with other frameworks where you have to manually tune several prompts — not knowing whether an upstream prompt change can break the entire workflow downstream — it becomes clear how useful you’d find DSPy in building compound AI pipelines.
Evaluation#
As mentioned, DSPy makes you think upfront about metrics and evaluation. The moment the custom module is written, you can run the pipeline end-to-end on a subset of the data and immediately evaluate it using an evaluation script, as shown here ⤴.
The key part to note here is our metric, where we define an integer value of 1 or 0, for whether or not there was an exact match between DSPy’s prediction and the ground truth. The final score is the sum total of all exact matches obtained for each and every expected field.
def metric(gold_val: Any, pred_val: Any, trace=None) -> int:
    """
    Define a DSPy metric for evaluation (and optionally, for optimization).
    Here, we calculate an exact match score.
    """
    # Handle None/empty equivalence
    if gold_val in [None, []] and pred_val in [None, []]:
        return 1
    return 1 if gold_val == pred_val else 0
Running the evaluation on the small dataset we have here (12 articles) gives us the following result:
============================================================
EVALUATION RESULTS
============================================================

Total Accuracy: 82.6%
(119/144 field comparisons correct)

----------------------------------------
FIELD-LEVEL ACCURACY
----------------------------------------
article_type                83.3%
child_company               83.3%
child_company_ticker        91.7%
company_1                   91.7%
company_1_ticker            83.3%
company_2                   91.7%
company_2_ticker            83.3%
deal_amount                 41.7%
deal_currency               75.0%
merged_entity               91.7%
parent_company              83.3%
parent_company_ticker       91.7%

----------------------------------------
MISMATCHES BY FIELD
----------------------------------------
article_type              Article IDs: [8, 9]
child_company             Article IDs: [8, 9]
child_company_ticker      Article IDs: [9]
company_1                 Article IDs: [9]
company_1_ticker          Article IDs: [1, 9]
company_2                 Article IDs: [9]
company_2_ticker          Article IDs: [1, 9]
deal_amount               Article IDs: [2, 4, 5, 6, 8, 9, 10]
deal_currency             Article IDs: [2, 8, 10]
merged_entity             Article IDs: [9]
parent_company            Article IDs: [8, 9]
parent_company_ticker     Article IDs: [9]
For the google/gemini-2.0-flash-001 model, we start off with a baseline exact match accuracy of 82.6%.
The “mismatches by field” output shows that articles 8 and 9 have the most mismatches across several fields,
indicating that we can provide examples to the optimizer that target these specific areas for improvement.
Optimizers in DSPy are also exposed through a declarative interface. They operate directly on a module,
and they automatically target the underlying components such as the system message and few-shot examples.
Optimization in DSPy is a much larger topic in itself, so stay tuned for more in the next post!
Summary of signatures and modules#
In this post, we covered the key abstractions in DSPy, and showed how simple it is to get started. As a developer, you begin by defining signatures, which are a programmatic way to declare your intent and specify the expected input/output types. You then define a custom module (or multiple built-in modules) that call their respective signatures. Signatures and modules depend on adapters under the hood1 to formulate the prompt for the LM to accomplish its task.
As a developer, you interface with LMs via a declarative, programmatic abstraction on top of natural language prompts, and it’s DSPy’s job to manage the nuances of how the prompt is phrased and formatted. All you need to focus on is defining the logic of your workflow and building it out end-to-end, to evaluate its baseline performance. Right upfront (even before you begin optimizing anything), the focus is to define success metrics that help you measure the performance of your baseline implementation.
Misconceptions#
It’s worth also clarifying some common misconceptions of DSPy that people have when coming from other frameworks:
-
DSPy is not a prompt optimization framework. It’s simply a declarative way to composably build AI systems. Using optimizers in DSPy is optional, and optimizers can operate on a much larger space ⤴ than just prompts (including weights, and in the future, signatures, adapters and modules themselves)!
-
DSPy doesn’t “automate away prompts” — there’s still a prompt operating under the hood — it’s just that you, as a human, don’t need to fixate on the prompt itself. In DSPy, you think in terms of signatures, not prompts. While you may still specify a part of the prompt by hand (as we did in the signature’s docstring), the focus is mainly on what needs to be said (crisply and concisely), without worrying about how exactly the prompt is phrased or formatted.
-
You don’t need a lot of examples to optimize your DSPy pipeline. As we’ll explore in the next post, all you need to begin optimizing your modules in DSPy is a handful of samples, starting with 10-20, which is sufficient for bootstrap few-shot optimization. And once you see the improvements, an additional 200 examples can go a long way with the more advanced optimizers.
-
You’re not limited to using only the built-in modules — in fact, it’s actively encouraged for you to write a custom module for each and every DSPy project. Everything is designed to be flexible and transparent, and the core abstractions in DSPy offer a lot of expressive power that enable arbitrarily complex workflows.
Takeaways#
It’s been said plenty of times that “English is the new programming language”. While this may be true to some extent (judging by the performance of recent LMs on tasks like coding, summarization and more), we also know that natural language isn’t the most reliable way to obtain specific behaviours from AI systems, especially when you have multiple prompts.
When you prompt a language model, the natural language instructions must be translated all the way down to the model’s weights. The mechanics of how they are compiled down to instructions that the LM understands, may not yet be fully understood by us humans, but that doesn’t mean we, as developers, should be forced to resort to trial and error to find that one “perfect prompt”.
The best prompts are not just written (by humans), they must be discovered (by algorithms).
DSPy adds a programmatic layer of abstraction atop the natural language one that we’re familiar with, allowing the model to write the prompts3, and the optimizer to discover better versions of them. Tying this back to the larger point about good abstractions, DSPy’s design allow you to translate your ideas into code, such that your overall intent is passed down to the LM’s weights (which actually perform the task at hand). As such, DSPy can be thought of as a “compiler” for LMs that translates high-level concepts into low-level instructions.
In the end, DSPy innovates over traditional frameworks on two fronts: a) it adds a declarative programming abstraction on top of natural language prompts, and b) it plugs in optimizers that seamlessly fit into an existing module’s workflow. As models continue to evolve, the overall logic of your signatures, modules and optimizers can remain largely unchanged (only the adapters that formulate the prompts need to evolve accordingly).
To begin appreciating the simplicity and power of DSPy’s abstractions, simply begin rewriting your existing prompts from other frameworks using signatures and modules in DSPy, and you’ll find that there’s an ocean of possibilities out there!
What’s next?#
This post ended up being rather long, so we’ll dive deeper into other key concepts in DSPy in upcoming posts, namely, optimizers and adapters. We’ll also look into the actual prompts that DSPy’s adapters generate under the hood, and understand what parts are exposed to the optimizer to improve the module’s performance on the task.
The code for the examples shown in this post is available here ⤴. You can also check out the other posts in this series: 👇🏽
Footnotes#
-
Adapters ⤴ are an evolving part of DSPy’s internals, but they play the important role of being the bridge between structured signatures and language model APIs. It’s the adapters that build and format the actual prompt used by the module, which makes the LM invocation on behalf of the user. ↩ ↩2
-
We won’t go into it in too much detail in this post, but you can always run the
dspy.inspect_history(n=1)downstream of the module invocation to inspect what the actual prompt looks like. DSPy is not a black box — everything is transparent and, to the largest extent, customizable by the user. ↩ -
Watch this excellent talk ⤴ by Drew Breunig titled “Let the LLM write the prompts”, explaining the logic of writing compound AI pipelines and how optimizers can help us. ↩